Industrial Grade Creativity from the Mind of the Monkey
It is often said that the best projects come from scratching an itch you have and that is certainly the inspiration for this one. My wife and I love to cook, and we are both gear heads, subsequently we have way more pots and pans than we need, or than our small farmhouse kitchen can store. We considered cutting back on our gourmet accoutrement, but just could not bear the thought of parting with our fajita griddle, extra No. 6 cast iron skillet or monkey-shaped baking pan, so a new storage option was in order. A quick survey of the kitchen revealed that we had some unused space along the wall under our kitchen table so we set out on a quest for a new pot rack. We searched high and low, but could not find anything that used the available space well, except for a $200 dollar model from Williams-Sonoma. So we abandoned that quest and headed over to Lowe’s for some lightbulbs. While picking up a pack of spiral CFL’s, suddenly a metaphorical lightbulb went off and we decided to make our own Pot Rack, custom designed and built for our available space.
We started off looking at existing shelving and racking options, but we were not happy with any of those and customizing them seemed more trouble than they were worth. So I decided that I could build a simple rack out of the same aluminum blanks that I used for the campstove pot stand, but when I looked at the metal options I found just what I was looking for and a new project was born. So what do you need to make this Monkey Tested, Frog Approved Wall Mounted Pot Rack?
Ingredients:
1- 6 foot section of 1.25 X 1.25 inch, 12 gauge, perforated angle steel
8- 1.5 inch screws with drywall wall anchors
8- 13/16″ washers
10- #60 stainless steel “S” hooks
Tools:
Hacksaw
Grinder or heavy file
Drill with 1/2″ bit
Phillips Screwdriver
Hammer

Where did that monkey pan go?
This is a super simple build, but sometimes simple is better. In fact I am almost embarrassed by how easy this is, once you find the correct materials, but it works so well, that I just have to share it. I wish I could think of some great, needlessly convoluted way to make this process more complex, but the simple, utilitarian design of this rack, just will not allow for it.
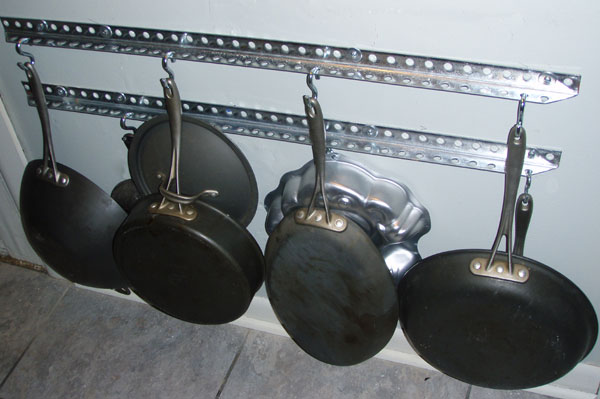
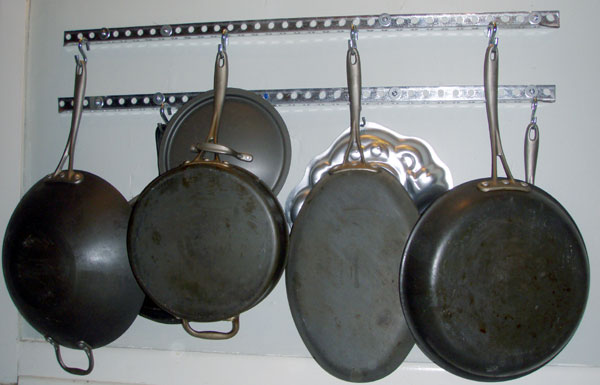
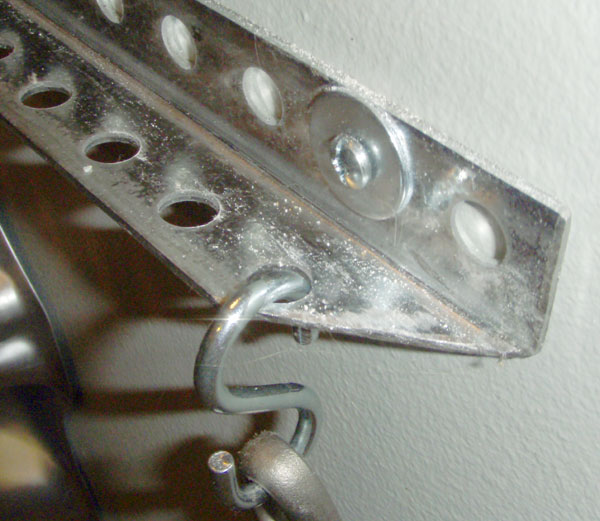
We had a space of roughly 36″ to work with under the table, between the legs, so we opted for a dual level 36″ rack. We began by cutting the angle steel in half, leaving us two 36″ pieces. I used a hand hacksaw for this cut, but you could use a jigsaw with a metal cutting blade, a cutting torch or Richard Kiel’s teeth, in a pinch. Technically, you could go mount these on a wall at this point and have all of the functionality, but I did not like the unfinished look and I was concerned about safety issues. To solve both of these problems I decided to make a diagonal cut from the corner of the “L” to the outer edge of the “shelf” portion of the bracket. After making the first cut with a hacksaw, I switched to a portable bandsaw for the next three, as that was much easier. After making these cuts, I used a rotary grinder to smooth out the sharp edges, finishing up with a wide file for a nice finished look. Making these angle cuts and finishing the edges is time-consuming, but it is far more aesthetically pleasing and it makes for a much safer rack, which is important since this is mounted low enough for children to get to.

Kid Friendly Corner
So, that is it for construction, buy perforated angle steel, make five cuts and finish the edges, pretty simple, huh? Good, because it is supposed to be easy. To install your racks, measure the space and decide on the proper height. In our case it was 22″ for the bottom rack, so we measured up and struck a line, held the rack in place and marked where to drill our holes. I opted to go with four supporting screws, basically because I thought it would be prettier that way, but also because when hanging heavy pots and pans, more support is better. So drill your four holes and install the wall anchors, then mount the rack using the screws and washers. I chose these washers for two reasons, first, because you need something to keep the screwheads from passing through the perforations in the angle steel, and secondly, because these large diameter washers with small center holes give this a more finished look. Although the final product has an industrial look, the angled corners and attention to details like these washers, give it a definitely designed flair.
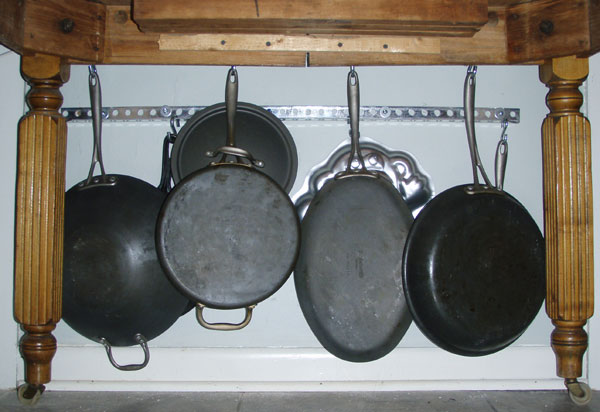
After mounting the first rack rail, we decided to go ahead and mount the second at 27″ and to place our screws in the same positions as the first for a finished look. With both rails in place, we began hanging pots and pans in the existing holes using our purchased “S” hooks. Once the rack was stocked we slid the table back into place and marveled at how much better things looked without pots and pans stacked everywhere.

What’s under your table?
I am far more proud of this project than it’s simple construction allows for, but it solved a problem that has plagued us for a while and it did so in a particularly elegant way. We are now utilizing an easy to access yet hidden storage space, in a clever and economical way. The materials to put this together cost about $30.00 and we got far more storage out of this space than any “store-bought” option could provide, with a design flair that should satisfy even the most discerning recessionista. If you don’t care for the industrial look of raw steel, a quick coat of spray paint will make this match any decor and I think it is pretty enough to display, even though I hid mine under the table. So there you go, a simple wall-mounted pot rack for around $30.00 and less than an hour’s work. This is an itch that has been well and truly scratched.
Bear in mind that I was building this for a specific space under my kitchen table, therefore the dimensions are for my available space. You should feel free to size this up or down to fit your own space or artistic bent. I can envision making several shorter racks and then hanging them at varied heights on a wall in the kitchen to make the display of cookware more like an artistic installation. I have too much art and not enough wall space for that, but that won’t keep you from running wild with this.
I just finished reading this & it is great…I too have a very small kitchen & a whole lot of pots & pans…I’ll be gauging available wall space this evening
Sending this link to my daughter since she always checks out the pot racks. Thanks.
thanks !! very helpful post!
OK, I have to know – is that Mardi Gras pattern floor tile? I’ve been looking for some to remodel my kitchen. Do you know where I can get some?
Oh – yeah, nice rack too.
I made somethingthing similar, and arguably, even simpler for my own kitchen recently.
Of course, I didn’t do such a good writeup 🙂 I had been looking at commercial hanging storage spaces, and thought they were all far to expensive for what they were, so with some concrete reinforcing bar, some string, two screws and a coat hanger cut up and bent into hooks, I arrived at:
http://www.tweak.net.au/pics2/2009/January/miscstream/pichtml/web_2009_01_16-23_23_48–crw_6908_jfr.html
Cheers,
@ Karl
Very cool rack, I love the simplicity of it.
@ Kitchen Pans
I don’t remember the name of the pattern but the flooring came from Lowe’s about six years ago.
This is fantastic!!! Question: Do you think I could turn this into a hanging pot rack over a stove top that’s set into an island? Could you give me ideas on how to do that? Thanks so much!!!